
North American F-86 Sabre - PSSA Glider - Mass Build 2020
Build by John Marchant (Sept 2020)
So, haven't built a model for a fair number of years but . this Sabre caught my eye. I needed something to do whilst away for work during the week on my narrow boat. This should be a bit of a challenge as space is very, very limited.
 First things first. I built a building board, timber frame with ply on one side for rigidity and plaster board on the face so I can stick pins in. Cut the plan to fit the smaller build board to give myself a little wiggle room.
 The wing is built on a sub frame to ensure correct dihedral and washout. These were pre cut as part of the short kit but all slots were undersize and had to be sanded out so they would fit. the who;e assembly is then like an accordian and needs to be pinned down to maintain the correct alignment over the plan.
 I used scrap balsa glued to the frame and then pinned down to do this.
 Bottom wing skins are then added. I have pinned the skins down between each ribs to hold the shape whilst the glue dries. I have left these a few mm oversize so I can sand down to the false leading and trailing edges when fitted. Rib and spar positions now need to be drawn onto the wing skin.
 All of the wing ribs need to be sanded on the leading and trailing edges to follow the angle of the swept wing. The spar slots also need to be angled in the same way. They can now be glued down over the bottom spar. False leading and trailing edges have been left oversize to cut back and sand when dry.
 Square holes cut for thin ply servo hatches and servo extension leads added.
IMPORTANT note the pins holding down the lower wing sheeting, these must be removed before applying the top wing skin.


 Now time to trim the excess sheet
 Topside of the wing
 Bottom view of the wing
 Wing tips and trailing edge added. Leading edges and wing tips sanded to shape. This made a real mess on the boat. Not much more I can do on the boat as the build board for the fuselage is too large. This will be completed at home when time allows.
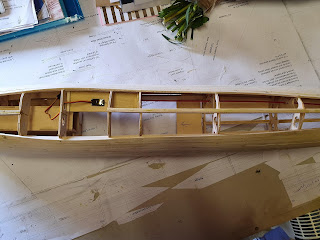
 Fuselage framework underway
 The start of the planking
 Some more progress on the fuselage planking
 Bit the bullet and joined the fuselage halves, don't forget the battery box and wing bolt plate
 I have added a servo tray and snake for the elevator before joining the halves
 with the snake going through the pre made holes in the fuselage formers, it had too much of an angle to get to the crank for my liing. I removed the snake from the last hole and secured in a more central position
 I managed to break the bell crank when drilling the holes in the fuselage for the rear tailplane rod. too impatient to wait for another (if i can even get one at the moment) so have made a repair. Not pretty but should be stronger than the original
 Fuselage is getting there
 Tail planes now sorted with brass tubes in
 fin and tail planes fitted
 Starting to look like a Sabre now
 Glassing has started
 I have opened up the servo cutouts to accept standard plastic servo holders
 All glassed ready for paint. There is a huge amount of sanding to get to this stage. far from perfect but fairly happy with the results
 A coat of high build primer
 Rubbed back, second coat of primer and rubbed back again

coat of standard primer, rubbed back and a second coat added. rubbed back again, ready for colour coats
 Finally got her finished

Balanced the c of g as well


 Ready for a good blow on a steep hill to see if she will fly
So, haven't built a model for a fair number of years but . this Sabre caught my eye. I needed something to do whilst away for work during the week on my narrow boat. This should be a bit of a challenge as space is very, very limited.


IMPORTANT note the pins holding down the lower wing sheeting, these must be removed before applying the top wing skin.


An interesting build procedure, well described. Well done John.
ReplyDeleteGreat job with your Sabre build John. Coming along well. Enjoying the build blog too.
ReplyDeleteTry to glue your wing skins before u use them.this way you can sand them on a flat board and never worry about the seam.Sanding them after ,you only sand above the ribs
ReplyDeleteGood shout, thank you. Next time.....
Delete