My Flamingo Build Nears Completion
This year I’ve been busy building the Chris Williams designed 1/5th scale 3.5m model of the Flamingo HW-4 of which I've previously written a blog that's found on the home page and I’m glad to write that it’s almost complete but I'll be waiting till the New Year to give it its maiden flight.
The model is built and covered and now has a set of decals applied that I made myself and what fun that was.
If you looked closely you might have noticed the hole in the nose where the aerotow hook resides and if I can find somewhere close and someone with a plane to pull it I want to give it a try as well as flying it off the slope.
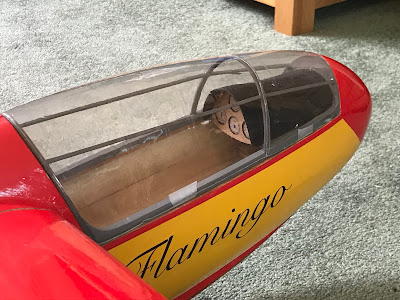
I made a canopy from a water bottle but I’m not happy with it (it's so big you have to split a two litre bottle down the middle and even then it was difficult to fix to stop it contracting too much under heat), I did make it in two pieces but I’m not happy with the result so I’m buying one from Sarik. The grey frame and canopy hoop were made from spruce, in the plan they are painted on the canopy but I had an hour or two to spar4e so I made a physical one.
And now with the Sarik canopy fitted and a pilot installed.
Normally I would cover a glider with Oratex but weight is less of an issue with this glider having an AUW in the region of 3.5kgs so I opted to use HobbyKing material. I have used it before and I think it’s good value for money and whilst heavier than Oratex and slightly less stretchy I thought I could go with the cheaper option.
Covering the wings was relatively straight forward though I did opt to split both top and bottom into two sections, inner to the Gull break and another outer section. The ailerons are huge and hinged in three places so I covered the bottom separately and the top of the wing and aileron tops were done in one piece.
Covering the fuselage was my biggest problem area as there are multiple areas where the plywood surface changes in 3 dimensions. My first idea was to cover the fuselage with yellow in one piece wrapping it around from the bottom towards the top but in the event I needed as many arms as an octopus. Two arms just didn’t do it, so I ended up with a join on the bottom along the keel and applying a piece of yellow nose to tail on each side and similarly the red; even so it took a lot of pulling, stretching and heat to get a reasonable finish on the front areas.
Making the decals proved to be fun. First the “Aeroclube de Bauru" logo has been downloaded from their website, which of course meant there was detail behind the logo that I didn’t want so I spent three or four days editing out the detail I didn’t want using a photo editor. The other text based decals were easily made using my editor on the laptop and searching for suitable fonts.

Producing the decals though created their own problems - I bought some clear water slide decal paper for ink-jet printand followed the instructions but what it didn’t tell you was to very heavily soak the printed decals before attempting to immerse in water to slide them off, the instructions suggested one spray would suffice but one didn't. I lost four or five A4 sheets before I stopped the colour running at which point I had applied 3 layers of sealant to the decals. Another problem I had was the decals distorting when slid off the backing paper which entailed some fun pushing and pulling them back into shape.


