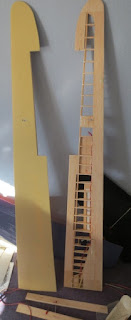
Here's the original when I got it -
As you can see, it really needed a complete stripdown and rebuild.
I started with the wings and uncovered them to find rusty old servos and rubbish wiring, so I replaced the servos and wiring and decided to rework the airbrake mechanism which was originally made to run from a single servo in the fuselage turning long pushrods in each wing to the airbrake mechanism. I replaced this whole thing with individual servos in each wing connected directly to the airbakes - as follows -
This eliminated the sloppy old mechanism and makes them very quick to operate.
I had to replace a lot of wood in the wings to get them up to scratch because there were a lot of finger holes from rough handling and I replaced the wing joiners with carbon rods and new metal rods , because the wing doesn't meet the fuselage square-on, I also had to move the wing joiner tubes inside the wings to make it all fit properly -
I decided to cover the wings with Solarfilm Matt which is like nylon and makes them more durable
Here's a finished wing except for adding some extra colour or something to break up the mass of 'cream' Solarfilm
I am now working on stripping the fuselage and tail surfaces - the fuselage is moulded fibreglass so I'm going to rub it down and recolour it with spray paint
I have now stripped down the fuselage and the tail surfaces as well as I can given their age and the very old sticky solarfilm (or whatever was used). The fuselage is fibre-glass so I rubbed it down well, especially where there were old repairs and cracks which I repaired. I also started to fill the holes in the fuselage which are no longer required because of the new way I operate the airbrakes and the new wing joiners -
I found that the tail surfaces had been broken too sometime in the past, so I carefully repaired them as well.....
Here's where I'm at right now -
Here's the fuselage after 3 base coats and 3 top coats, then wait a week and lightly polish with car polish to add a slight sheen
Rob


coming along well Rob. Keep us updated!!
ReplyDeleteYou're putting in an impressive amount of time and effort here Rob. It looks like a very rewarding project. Substituting new micro technology for the original rods and levers offers a 'quick win' when working on older models like this...
ReplyDelete